A Labor of Love
When I was 18, I spent a summer stripping painted glazing putty from hundreds of windows in what is now the Tudor Arms Hotel, built in Cleveland in 1933. After soaking the windows for hours in paint stripper, I’d then chip away any remaining putty. Sometimes it would come right out, sometimes it would stick. Occasionally, the glass would break. At times the stripper would do so much damage to the wood that it warped, nearly ruining the sash. If any putty was left, I would warm it with a heat gun and chip it out—also at risk to the precious glass. Now that I’m restoring my own windows, one of my goals is to save as many of the original panes of 130-year-old glass as possible.
Restoring wood sash windows isn’t difficult, but requires patience and plenty of elbow grease. Kindra Clineff
Our sash windows are common to 1880s-era houses, and to houses built about 50 years in either direction. This straightforward style contains two sashes, an upper and lower, which are movable and counter-balanced by large weights that live in vertical cavities beyond the jambs of the window frame. When a sash is raised or lowered, the lead sash weights, attached to the sash by cords (or sometimes chains), travel up and down in the hollow channels, allowing the windows to stay open without any other props or stays. It’s a simple, functional system that works quite well and is easy to repair.
With simple operation and built from old-growth wood, sash windows predate and defy the notion of built-in obsolescence. Kindra Clineff
That is, until the windows are coated in layers of paint, the sash cords fail or are cut, the glazing putty hardens and pulls away, and wood begins to rot. These eventualities call for different remedies. Replacing sash cord is relatively easy (see OHJ, June 2016), but stripping, repairing, and readying the sash for new glazing is the most labor-intensive aspect of window restoration. Since my windows had not been restored for a very long time, I decidedly to remove them and work on them in my shop, one by one.
Because there’s no good way to score old paint on an exterior window, the author taped an oscillating tool to a pole and reached outside the window to make the cuts. Wear safety glasses! Wendy and Alex Santantonio
Sanding Away
Use a utility knife to free sashes from multiple coats of paint. Cut along the edge of the sash where it meets the trim. Wendy and Alex Santantonio
After I’d removed the majority of the old putty and paint, I moved onto sanding. Using a 10-gallon HEPA dust extractor in combination with a multi-mode random orbital sander (I used a Festool Rotex RO 90 with hard pad and 80-grit sandpaper), I was able to rip right through the remaining layers on the flat sections of the sash. The dust collection is excellent and the smaller, 90 cm head on the sander is absolutely perfect for this sort of intricate detail. Additionally, the triangle sanding pad on the oscillating sanding setting allowed me to get right into the corners without doing any damage to the sash. With initial sanding complete, I used scraping tools and a heat gun where necessary on the remaining paint or putty caught in crevices on the decorative profiles.
Initial Repair
Fungal decay or dry rot indicates trouble. Wendy and Alex Santantonio
Once the entire sash was as free of paint as I could get it, I began to repair and rebuild sashes that had begun to more-or-less fall apart at the joints. First I glued up any broken or split pieces that hadn’t come completely free. Then I cut filler strips from old salvaged pine I found in the attic. I carefully cut them to size, but still needed to plane them a bit to get them to fit nice and snug. After I glued the strips in place and clamped them to cure, I planed and sanded them flush with the surrounding sash.
Then I removed the wood pegs that secured the mortise-and-tenon joints together. In most cases, I was able to remove the old peg, clear away dirt, and re-glue it in place. A few pegs were beyond saving. For these, I cut new pegs from old stock, slightly tapering them with a hand plane, and inserted them into the window sash for a tight fit.


Filling in the Gaps
The next step was to fill all gaps, cracks, missing sections, or crevices with two-part wood epoxy (I used my old favorite, WoodEpox from Abatron). Easily moldable and with a generous working time, the filler allowed me to rebuild any structure that had been lost over the years, and also fill in anywhere my new filler strips weren’t perfect, or where my pegs didn’t end up a perfect fit at the top. After a 24-hour cure time, I sanded the lumpy, overfilled epoxy into smooth and nicely proportioned sections of window sash. As a final step, I used fine steel wool and some elbow grease to really get into the detail areas of the sash, completely sanding everything smooth.
When to Prime
I like to prime the sash before placing the glass, for several reasons. Obviously, it’s far easier to prime without concern of getting paint on the glass. Priming first also creates a protective barrier that will let the putty set up as it should. Finally, primer covers all of the wood, including areas that will ultimately be covered by weatherstripping and sash lifts. That said, some pros prefer to leave the protected sides of the sash exposed to air, in order to let the wood breathe. Others say to prime the sides but leave them unpainted to allow for smoother sash operation. The choice is up to you.
The restored window sash is shown back in place in the author’s home, a working-class Victorian row house built ca. 1886 in the Old Town Historic district of Alexandria, Virginia. The window is still missing its parting bead, the surrounding trim, and a fresh coat of paint. Wendy and Alex Santantonio
Stripped to Perfection
Stripping is undoubtedly the most tedious part of window restoration. Old school, less-than-ideal methods like dipping the sash in toxic solvents or using a heat gun on the old, fragile wood (near glass) have been superseded by gentler techniques that harm neither wood nor glass, including infrared heat and steam. You still have to scrape away softened paint and glazing, but the process will be much easier.
- Infrared heaters use low heat to soften multiple layers of paint, making it easy to scrape away. Used properly, the tool will not damage wood or glass. Look for an infrared heater that’s EPA compliant and internationally safety tested, like Eco-Strip’s Swedish-made Speedheater and Cobra products.
- The concept of the steam chamber or box is simple. You place the window sash into a tightly closed box, pump hot steam into the box, then let the sash “cook” in the steam for 30 to 40 minutes. (Alex built his own—check out the post at oldtownhome.com.) Carefully but quickly remove the sash—the steam is very hot—then scrape out the softened putty and remove any softened paint. If you’re not up for building your own stripper chamber, a commercial one is available from Bagala Window Works.
The sash is lavishly coated in a 50/50 mix of boiled linseed oil and turpentine. The turpentine allows the oil to penetrate old, damaged wood, then evaporates as the oil cures. Wendy and Alex Santantonio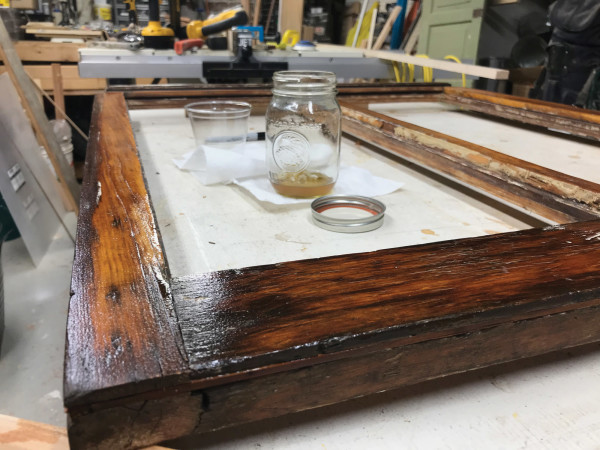
Help for Dry Wood
As I stripped and sanded the sash, I noticed the wood was weathered and grey. After the paint failed on the exposed sides, the sun continued to bake the windows and water from rain and snow penetrated all the way to the wood. This left the wood deteriorated, ready for fungal attack and eventual failure. To rehabilitate the wood, I used a trick I learned from Jade Mortimer of Heartwood Restoration. It’s something called BLO-Pentine, a mixture of boiled linseed oil (or BLO) and turpentine: BLOP for short. It’s a recipe that’s been suggested in Old-House Journal since the 1970s.
After three coats of BLOP were fully cured, the author hand-sanded the sash with 400-grit sandpaper. Wendy and Alex Santantonio
Boiled linseed oil is a favorite of woodworkers for its ability to protect unfinished wood. When dealing with dry, sun-damaged wood, however, linseed oil alone sits on the surface, not penetrating into the wood fibers. Combining linseed oil with turpentine at a 1 to 1 ratio provides a delivery mechanism for the oil to penetrate the wood. The wood drinks in the mixture. When the turpentine evaporates, it leaves behind oil, both on the surface and impregnated into the wood. The oil slowly cures, and now the wood has natural protection against the elements. It’s important to use high-quality products for this process. I used boiled linseed oil and crystal-clear balsam turpentine from Sweden from American Rope & Tar. Mix a small amount at a time, stirring and swirling in a mason jar. Liberally apply the mixture with a foam brush. The wood should absorb the BLO-Pentine almost as quickly as you can apply it. I applied three coats, allowing each to dry for at least 12 hours. Once it was fully cured (in a week or so), I lightly sanded it. —A.S.


Step by Step Window Repair
1. Working on an open grid bench so that paint and old grout can fall through, a worker runs a sharp common carbide scraper over a window frame.
2. New lights for an old sash are cut from recycled antique glass, which requires extra care because of irregularities in its makeup.
3. A special glazing hammer is used to gently tap in a tiny glazing point to secure the pane of glass in the sash.
4. New putty must seal the glass to the wood, allowing the window to shed water and prevent leakage.
5. The last step before painting is to create a clean, fluid line with the putty knife, tidying the putty into mitered corners. The putty is allowed to cure for a few days before the window is sent to the painting room.
Shop Tour: Window Woman of New England
“We buy these antique houses because we love antique houses. But once you start taking pieces away from it, you don’t have an antique anymore.” —Alison Hardy, Window Woman of New England
Alison Hardy can eyeball a sash and often identify its age by the thickness and wavy or bubbly characteristics of the glass. Kindra Clineff
To hear owner Alison Hardy explain it, her Amesbury (Mass.) workshop is actually a hospital for ailing windows. On a bright day, sunlight streams through the many windows at Window Woman of New England, where 15 artisans scrape, putty, paint, and tap window sashes back into shape and send them into the next century.
Alison Hardy is a strong—make that obsessed—advocate for repairing rather than replacing windows. She’s chairman for the Window Preservation Alliance, an organization that advocates preserving original windows for their beauty, craftsmanship, and energy efficiency. “Original windows are so much better built than new windows,” says Hardy, noting that almost any window built before 1960 can be restored. “You have something that’s already lasted 100 years. If you invest in a little bit of maintenance, it will last another 100 years.”
Typically, only critical cases end up at the shop. If repair is possible when the Window Woman team arrives on site at a client’s home, remedies are applied right there and then. Broken panes of glass, dysfunctional ropes, and faulty locks often can be addressed at the scene. More complicated problems come back to the workshop—as well as any window that requires paint removal. (On the assumption that lead paint is always present, staffers always use special vacuums and specific equipment.)
Hardy got into the window game by necessity. In 2002, together with her husband, she bought “a disaster of a house,” ca. 1850, with a quirky amalgamation of window styles. “Totally different historical eras were represented,” she says. When she tried to find expert help, she found almost nobody in the field locally. So she experimented, found that she loved the process, and realized that she could fill a niche. In 2003, Window Woman of New England was born: “And we’ve been crazy busy ever since.”
In the shop, Hardy demonstrates a technique for picking paint out of corners. Kindra Clineff
Repair techniques are the same regardless of a sash’s vintage. Each window has its individual challenges, with the condition of muntins and frame entering into the equation. Such variables result in a range of quoted prices: from $50 to simply fix a pane of antique glass to $2,000 for paint removal, rot repair, and reconstruction. —Written by Tovah Martin
The windows at Olson House, now a museum and famous as the setting of Andrew Wyeth’s painting “Christina’s World,” were recently expertly restored by a team from Bagala Window Works. Courtesy Bagala Window Works
Replacement Glass
To replace broken or missing glass, you have three options: buy new restoration glass, order antique wavy glass from a dealer, or salvage the glass from an old sash yourself. The Santantonios chose the last option, which is by far the cheapest. When visiting salvage yards, look for a sash window that has panes of glass large enough to trim to the size needed. Alex looks for glass that is either exactly the right size, or 4″ larger, making it easier to cut it to size. Be sure to take glass cleaner and paper towels with you to the salvage yard, so that you can clean the glass and get a true sense of its appearance.
Be sure to take glass cleaner and paper towels with you to the salvage yard, so that you can clean the glass and get a true sense of its appearance. Kindra Clineff
Cutting New Glass
The key to cutting new glass is to measure carefully and recheck your measurements before marking and cutting. Alex advises measuring the opening size of the glass needed and deducting /” from the measurement on each side, to allow a little wiggle room for movement and contraction, as well as a possibly imperfect opening.
Measure and mark the glass using a Sharpie, as a point of reference to make the cuts. (It washes off easily afterwards.) Then gently clamp the straightedge just off the line so that the glass cutter can ride the straightedge the whole length of the cut. A sharp cutting wheel is paramount to a successful cut. It’s debatable whether cutting oil is useful or not, but Alex advices he’s always had better luck with cutters that incorporate auto-fed oil as part of the cutting process.
The cutter’s job is simply to score the glass on a line that will give the glass a predictable, clean break line. When scoring the glass, make a single slow pass with even and not-too-hard downward pressure on the scoring wheel. Once the first line is scored, pick up a pair of running pliers, mostly flat but with a very slight flare on either side of the center line; a rubber sleeve covering the end protects the glass. Line the pliers up with your score line, then apply subtle pressure, just enough to start the glass breaking on the line. When it works, you see the glass snap and start to crack along the line.
Repair Products
- Abatron WoodEpox and LiquidWood repair products
- American Building Restoration Products Non-toxic strippers
- American Rope & Tar Imported Swedish linseed oil, turpentine
- Durham’s Rock Hard Water Putty Wood-repair putty
- Eco-Strip Infrared paint strippers, tools
- Franmar Blue Bear paint stripper with Safenol
- Kilian Hardware Spring bronze weatherstripping
- Sarco Putty Dual glaze & type M putty (also sold by Abatron and SRS Hardware)
- Sashco Sealants Big Stretch caulk
- West System Two-part epoxies for wood restoration
Glass for Restoration
- Artisan Glass Works Old Style window glass in five grades
- Bendheim Glass Full and light Restoration Glass®
- Hollander Glass Multiple styles suitable for distinct historic eras
Sash Hardware & Parts
- Samson Rope Cotton sash rope with nylon core
- SRS Hardware Pulleys, chains & stackable sash weights; stop bead adjusters
Glass Cutting Tools
- Sharpie pen
- Straightedge
- Oil-fed glass cutter
- Cutting oil
- Glass running pliers
- Cut-resistant gloves
Story Consultants
- Window Woman of New England
- Window Preservation Alliance Connects historic-home owners with window restoration professionals